Introduction
I’m going to give a short introduction to brick,
a Haskell library for building terminal user interfaces. So far I’ve used brick to
implement Conway’s Game of Life and a
Tetris clone. I’ll explain the basics,
walk through an example snake application,
and then explain some more complicated scenarios.
The first thing I’ll say is that this package has some of the most impressive documentation and resources, which makes it easy to figure out pretty much anything you need to do. I’ll try to make this useful, but I imagine if you’re reading this then it is mostly being used as a reference in addition to the existing resources:
- Demo programs (clone down to explore the code and run them locally)
- User guide
- Haddock docs
- Google group
- GitHub Discussions
Notice: This is an old tutorial, based on the ancient brick-0.17.2. Brick is now at
version 2.*, and specific types, imports,
etc. will not be exactly the same. However, the way brick works is largely the
same. The code below is still visible on the branch
brick-v0.17,
and a version compatible with brick-2.1.1 is on
main.
The basic idea
brick is very declarative. Once your base application logic is in place, the interface
is generally built by two functions: drawing and handling events. The drawing function
appDraw :: s -> [Widget n]takes your app state s and produces the visuals [Widget n].
The handler
appHandleEvent :: s -> BrickEvent n e -> EventM n (Next s)takes your app state, an event (e.g. user presses the 'm' key), and produces the resulting
app state. That’s pretty much it.
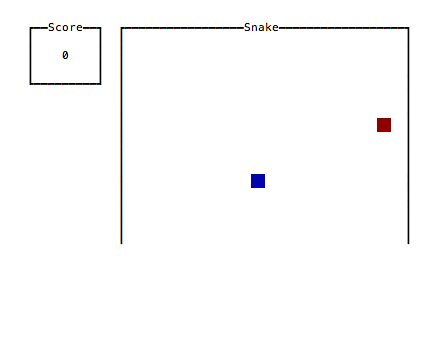
snake
We’re going to build the classic snake game that you might recall from arcades or the first cell phones. The full source code is here. This is the end product:
Structure of the app
The library makes it easy to separate the concerns of your application and the interface;
I like to have a module with all of the core business logic that exports the core state of the app
and functions for modifying it, and then have an interface module that just handles the setup,
drawing, and handling events. So let’s just use the simple stack template and add two
modules
├── LICENSE
├── README.md
├── Setup.hs
├── snake.cabal
├── src
│   ├── Main.hs
│   ├── Snake.hs
│   └── UI.hs
└── stack.yaml
and our dependencies to test.cabal
executable snake
  hs-source-dirs:      src
  main-is:             Main.hs
  exposed-modules:     Snake
                     , UI
  default-language:    Haskell2010
  build-depends:       base >= 4.7 && < 5
                     , brick
                     , containers
                     , linear
                     , microlens
                     , microlens-th
                     , random
Snake
Since this tutorial is about brick, I’ll elide most of the implementation details
of the actual game, but here are some of the key types and scaffolding:
{-# LANGUAGE TemplateHaskell, FlexibleContexts #-}
module Snake where

import Control.Applicative ((<|>))
import Control.Monad (guard)
import Data.Maybe (fromMaybe)

import Data.Sequence (Seq, ViewL(..), ViewR(..), (<|))
import qualified Data.Sequence as S
import Lens.Micro.TH (makeLenses)
import Lens.Micro ((&), (.~), (%~), (^.))
import Linear.V2 (V2(..), _x, _y)
import System.Random (Random(..), newStdGen)

-- Types

data Game = Game
  { _snake  :: Snake        -- ^ snake as a sequence of points in R2
  , _dir    :: Direction    -- ^ direction
  , _food   :: Coord        -- ^ location of the food
  , _foods  :: Stream Coord -- ^ infinite list of random food locations
  , _dead   :: Bool         -- ^ game over flag
  , _paused :: Bool         -- ^ paused flag
  , _score  :: Int          -- ^ score
  , _frozen :: Bool         -- ^ freeze to disallow duplicate turns
  } deriving (Show)

type Coord = V2 Int
type Snake = Seq Coord

data Stream a = a :| Stream a
  deriving (Show)

data Direction
  = North
  | South
  | East
  | West
  deriving (Eq, Show)
All of this is pretty self-explanatory, with the possible exception of lenses if you
haven’t seen them. At first glance they may seem complicated (and the underlying
theory arguably is), but using them as getters and setters is very straightforward.
So, if you are following along because you are writing a terminal app like this, I’d
recommend using them, but they are not required to use brick.
Here are the core functions for playing the game:
-- | Step forward in time
step :: Game -> Game
step g = fromMaybe g $ do
  guard (not $ g ^. paused || g ^. dead)
  let g' = g & frozen .~ False
  return . fromMaybe (move g') $ die g' <|> eatFood g'

-- | Possibly die if next head position is disallowed
die :: Game -> Maybe Game

-- | Possibly eat food if next head position is food
eatFood :: Game -> Maybe Game

-- | Move snake along in a marquee fashion
move :: Game -> Game

-- | Turn game direction (only turns orthogonally)
--
-- Implicitly unpauses yet freezes game
turn :: Direction -> Game -> Game

-- | Initialize a paused game with random food location
initGame :: IO Game
UI
To start, we need to determine what our App s e n type parameters are.
This will completely describe the interface application and be passed to one of the library’s
main style functions for execution. Note that s is the app state, e is an event type,
and n is a resource name. The e is abstracted so that we can provide custom events.
The n is usually a custom sum type called Name which allows us to name particular viewports.
This is important so that we can keep track of where the user currently has focus, such as
typing in one of two textboxes; however, for this simple snake game we don’t need
to worry about that.
In simpler cases, the state s can directly coincide with a core datatype such as our Snake.Game.
In many cases however, it will be necessary to
wrap the core state within the ui state s to keep track of things
that are interface specific (more on this later).
Let’s write out our app definition and leave some undefined functions:
{-# LANGUAGE OverloadedStrings #-}
module UI where

import Control.Monad (forever, void)
import Control.Monad.IO.Class (liftIO)
import Control.Concurrent (threadDelay, forkIO)
import Data.Maybe (fromMaybe)

import Snake

import Brick
  ( App(..), AttrMap, BrickEvent(..), EventM, Next, Widget
  , customMain, neverShowCursor
  , continue, halt
  , hLimit, vLimit, vBox, hBox
  , padRight, padLeft, padTop, padAll, Padding(..)
  , withBorderStyle
  , str
  , attrMap, withAttr, emptyWidget, AttrName, on, fg
  , (<+>)
  )
import Brick.BChan (newBChan, writeBChan)
import qualified Brick.Widgets.Border as B
import qualified Brick.Widgets.Border.Style as BS
import qualified Brick.Widgets.Center as C
import qualified Graphics.Vty as V
import Data.Sequence (Seq)
import qualified Data.Sequence as S
import Linear.V2 (V2(..))
import Lens.Micro ((^.))

-- Types

-- | Ticks mark passing of time
--
-- This is our custom event that will be constantly fed into the app.
data Tick = Tick

-- | Named resources
--
-- Not currently used, but will be easier to refactor
-- if we call this "Name" now.
type Name = ()

data Cell = Snake | Food | Empty

-- App definition

app :: App Game Tick Name
app = App { appDraw = drawUI
          , appChooseCursor = neverShowCursor
          , appHandleEvent = handleEvent
          , appStartEvent = return
          , appAttrMap = const theMap
          }

main :: IO ()
main = undefined

-- Handling events

handleEvent :: Game -> BrickEvent Name Tick -> EventM Name (Next Game)
handleEvent = undefined

-- Drawing

drawUI :: Game -> [Widget Name]
drawUI = undefined

theMap :: AttrMap
theMap = undefined
Custom Events
So far I’ve only used brick to make games which need to be redrawn as time passes,
with or without user input. This requires using Brick.customMain with that Tick
event type, and opening a forked process to forever feed that event type into
the channel. Since this is a common scenario, there is a Brick.BChan module that makes
this pretty quick:
main :: IO ()
main = do
  chan <- newBChan 10
  forkIO $ forever $ do
    writeBChan chan Tick
    threadDelay 100000 -- decides how fast your game moves
  g <- initGame
  void $ customMain (V.mkVty V.defaultConfig) (Just chan) app g
We do need to import Vty.Graphics since customMain allows us to specify
a custom IO Vty.Graphics.Vty handle, but we’re only customizing the existence of the
event channel BChan Tick. The app is now bootstrapped, and all we need to do is
implement handleEvent, drawUI, and theMap (handles styling).
Handling events
Handling events is largely straightforward, and can be very clean when your underlying application logic is taken care of in a core module. All we do is essentially map events to the proper state modifiers.
handleEvent :: Game -> BrickEvent Name Tick -> EventM Name (Next Game)
handleEvent g (AppEvent Tick)                       = continue $ step g
handleEvent g (VtyEvent (V.EvKey V.KUp []))         = continue $ turn North g
handleEvent g (VtyEvent (V.EvKey V.KDown []))       = continue $ turn South g
handleEvent g (VtyEvent (V.EvKey V.KRight []))      = continue $ turn East g
handleEvent g (VtyEvent (V.EvKey V.KLeft []))       = continue $ turn West g
handleEvent g (VtyEvent (V.EvKey (V.KChar 'k') [])) = continue $ turn North g
handleEvent g (VtyEvent (V.EvKey (V.KChar 'j') [])) = continue $ turn South g
handleEvent g (VtyEvent (V.EvKey (V.KChar 'l') [])) = continue $ turn East g
handleEvent g (VtyEvent (V.EvKey (V.KChar 'h') [])) = continue $ turn West g
handleEvent g (VtyEvent (V.EvKey (V.KChar 'r') [])) = liftIO (initGame) >>= continue
handleEvent g (VtyEvent (V.EvKey (V.KChar 'q') [])) = halt g
handleEvent g (VtyEvent (V.EvKey V.KEsc []))        = halt g
handleEvent g _                                     = continue g
It’s probably obvious, but continue will continue execution with the supplied state value,
which is then drawn. We can also halt to stop execution, which will essentially
finish the evaluation of our customMain and result in IO Game, where the resulting
game is the last value that we supplied to halt.
Drawing
Drawing is fairly simple as well but can require a good amount of code to position things how you want them. I like to break up the visual space into regions with drawing functions for each one.
drawUI :: Game -> [Widget Name]
drawUI g =
  [ C.center $ padRight (Pad 2) (drawStats g) <+> drawGrid g ]

drawStats :: Game -> Widget Name
drawStats = undefined

drawGrid :: Game -> Widget Name
drawGrid = undefined
This will center the overall interface (C.center),
put the stats and grid widgets horizontally side by side (<+>),
and separate them by a 2-character width (padRight (Pad 2)).
Let’s move forward with the stats column:
drawStats :: Game -> Widget Name
drawStats g = hLimit 11
  $ vBox [ drawScore (g ^. score)
         , padTop (Pad 2) $ drawGameOver (g ^. dead)
         ]

drawScore :: Int -> Widget Name
drawScore n = withBorderStyle BS.unicodeBold
  $ B.borderWithLabel (str "Score")
  $ C.hCenter
  $ padAll 1
  $ str $ show n

drawGameOver :: Bool -> Widget Name
drawGameOver dead =
  if dead
     then withAttr gameOverAttr $ C.hCenter $ str "GAME OVER"
     else emptyWidget

gameOverAttr :: AttrName
gameOverAttr = "gameOver"
I’m throwing in that hLimit 11 to prevent the widget greediness caused by the outer C.center.
I’m also using vBox to show some other options of aligning widgets; vBox and hBox align
a list of widgets vertically and horizontally, respectfully. They can be thought of as folds
over the binary <=> and <+> operations.
The score is straightforward, but it is the first border in this tutorial. Borders are well documented in the border demo and the Haddocks for that matter.
We also only show the “game over” widget if the game is actually over.
In that case, we are rendering the string widget with the gameOverAttr attribute name.
Attribute names are basically type safe names that we can assign to widgets to apply
predetermined styles, similar to assigning a class name to a div in HTML and defining the
CSS styles for that class elsewhere.
Attribute names implement IsString, so they are easy to construct with
the OverloadedStrings pragma.
Now for the main event:
drawGrid :: Game -> Widget Name
drawGrid g = withBorderStyle BS.unicodeBold
  $ B.borderWithLabel (str "Snake")
  $ vBox rows
  where
    rows         = [hBox $ cellsInRow r | r <- [height-1,height-2..0]]
    cellsInRow y = [drawCoord (V2 x y) | x <- [0..width-1]]
    drawCoord    = drawCell . cellAt
    cellAt c
      | c `elem` g ^. snake = Snake
      | c == g ^. food      = Food
      | otherwise           = Empty

drawCell :: Cell -> Widget Name
drawCell Snake = withAttr snakeAttr cw
drawCell Food  = withAttr foodAttr cw
drawCell Empty = withAttr emptyAttr cw

cw :: Widget Name
cw = str "  "

snakeAttr, foodAttr, emptyAttr :: AttrName
snakeAttr = "snakeAttr"
foodAttr = "foodAttr"
emptyAttr = "emptyAttr"
There’s actually nothing new here! We’ve already covered all the brick functions necessary
to draw the grid. My approach to grids is to render a square cell widget cw with different
colors depending on the cell state. The easiest way to draw a colored square is to stick
two characters side by side. If we assign an attribute with a matching foreground and background,
then it doesn’t matter what the two characters are (provided that they aren’t some crazy
Unicode characters that might render to an unexpected size). However, if we want empty cells
to render with the same color as the user’s default background color, then spaces are a good choice.
Finally, we’ll define the attribute map:
theMap :: AttrMap
theMap = attrMap V.defAttr
  [ (snakeAttr, V.blue `on` V.blue)
  , (foodAttr, V.red `on` V.red)
  , (gameOverAttr, fg V.red `V.withStyle` V.bold)
  ]
Again, styles aren’t terribly complicated, but it will be one area where you might have to look in the vty package (specifically Graphics.Vty.Attributes) to find what you need.
Another thing to mention is that the attributes form a hierarchy and
can be combined in a parent-child relationship via mappend. I haven’t
actually used this feature, but it does sound quite handy. For a more
detailed discussion see the
Brick.AttrMap haddocks.
Variable speed
One difficult problem I encountered was implementing a variable speed in the GoL.
I could have just used the same approach above with the minimum thread delay
(corresponding to the maximum speed) and counted Tick events, only issuing an actual
step in the game when the modular count of Ticks reached an amount corresponding to the
current game speed, but that’s kind of an ugly approach.
Instead, I reached out to the author and he advised me to use a TVar within the app state.
I had never used TVar, but it’s pretty easy!
main :: IO ()
main = do
  chan <- newBChan 10
  tv   <- atomically $ newTVar (spToInt initialSpeed)
  forkIO $ forever $ do
    writeBChan chan Tick
    int <- atomically $ readTVar tv
    threadDelay int
  customMain (V.mkVty V.defaultConfig) (Just chan) app (initialGame tv)
    >>= printResult
The tv <- atomically $ newTVar (value :: a) creates a new mutable reference to a value
of type a, i.e. TVar a, and returns it in IO. In this case value is an Int
which represents the delay between game steps.
Then in the forked process, we read the delay from the TVar reference and use that
to space out the calls to writeBChan chan Tick.
I store that same tv :: TVar Int in the brick app state, so that the user can change
the speed:
handleEvent :: Game -> BrickEvent Name Tick -> EventM Name (Next Game)
handleEvent g (VtyEvent (V.EvKey V.KRight [V.MCtrl])) = handleSpeed g (+)
handleEvent g (VtyEvent (V.EvKey V.KLeft [V.MCtrl]))  = handleSpeed g (-)

handleSpeed :: Game -> (Float -> Float -> Float) -> EventM n (Next Game)
handleSpeed g (+/-) = do
  let newSp = validS $ (g ^. speed) +/- speedInc
  liftIO $ atomically $ writeTVar (g ^. interval) (spToInt newSp)
  continue $ g & speed .~ newSp

-- where

-- | Speed increments = 0.01 gives 100 discrete speed settings
speedInc :: Float
speedInc = 0.01

-- | Game state
data Game = Game
  { _board    :: Board -- ^ Board state
  , _time     :: Int   -- ^ Time elapsed
  , _paused   :: Bool  -- ^ Playing vs. paused
  , _speed    :: Float -- ^ Speed in [0..1]
  , _interval :: TVar Int -- ^ Interval kept in TVar
  , _focus    :: F.FocusRing Name -- ^ Keeps track of grid focus
  , _selected :: Cell -- ^ Keeps track of cell focus
  }
Conclusion
brick let’s you build TUIs very quickly. I was able to write snake along with this
tutorial within a few hours. More complicated interfaces can be tougher, but if you can
successfully separate the interface and core functionality, you’ll have an easier time
tacking on the frontend.
Lastly, let me remind you to look in the demo programs to figure stuff out, as many scenarios are covered throughout them.